Saturday, July 30, 2016

Fiber & Friends #3

I've wanted to dye with indigo for a very long time, probably about as long as I've been fooling around with fiber. Indigo ikat sashiko, shibori and batik have always been favorites in shades of blue. I even own an indigo dye kit that I have never felt competent to use.

So I was absolutely elated to find that I could take a class in Cordova from a true natural dye expert, Kathy Hatori of Botanical Colors.  I had read enough about indigo to know that it was an art, not just a 1 2 3 set of instructions.

The class was held outdoors, at a cabin by Eyak Lake. It's a great idea to dye outdoors, for obvious color-drippy reasons.

Here's our class space--a propane burner and vat for each student, with various dyed and undyed skeins hanging about. The magenta and golden skeins were for overdying with indigo. I was so preoccupied with turning white yarn blue, I never got around to the overdyes.

My main aim was to dye my 6 skeins of Cormo wool from a Juniper Moon CSA share bought last year. My plan was to just plainly dye two skeins, dye two skeins shibori-style with resist areas, and do an ombre job on the last two.

First up was the process of making the vat: stirring up the indigo powder with a little henna and calcium hydroxide.  We started in quart jars and eventually progressed to the big pots of warm water. Because making indigo dye is an organic process, there's some waiting time, but eventually you get your vat ready to go, and it looks like this:


Bubbly scum on top, and a metallic sheen. The top of the vat is blue because the dye has oxidized in contact with the air, but the liquid below the surface is a green tea color. As you proceed with your dyeing, you must constantly check the color of the dye solution, and rebalance it with additions of fructose when it veers from that tea green.

One thing you quickly learn about indigo is that your fiber exits the vat not blue, but green. Then with exposure to air, the dye oxidizes and turns blue. Intensity and depth of color is not so much the strength of the dye solution, but the number of times the item has been in and out of the vat, each dip with a pause to air and oxidize.

Here is the pair of cormo skeins tied with rubber bands and ready to go in:


And here is a pair of the plain skeins after a couple of trips to the vat: 


They look a bit uneven because they have picked up some of the powder from the bottom of the vat. A plain water rinse evened them out and neutralized the pH from the dye solution.

 Here are my products of the day, posed with some fishnets for added ambiance--The darker blues are the plain skeins, the lighter ones the shibori and the other two. Plus the colorful non-overdyes.  Time and the waning strength of my dye vat made my later skeins much lighter than the first two, and the ombre version a goal for the next time.


Yarn is famously not the only thing that turns blue on indigo day. Indigo dyers are known for their blue hands. Though I wore gloves during the actual dyeing, I got a little blue in the paws just from handling the yarn to reskein it  before its final rinse.


Thursday, July 21, 2016

Fiber & Friends #2

The Net Loft encourages its community to be multi-craftual, and in keeping with this aim, many of the Fiber & Friends 2016 classes were not about knitting or spinning. The first one of these that I took was net making, a chance to learn the basics of fish nets, while making small decorative samples.

The class was taught by Bonnie Phillips, who mended nets in the original Net Loft when it was exactly that. She has had varied careers since, but has always made artistic use of net materials, buttons, beads, bones, and feathers. For a picture of Bonnie in her net mending heyday and the story of how she inspired Dotty Wideman to start a craft paradise called the Net Loft, look here.

Our classroom table was set up with a 2 cup hook jig at each place on the table, and with a packet of supplies and some instruction, we wound our needles with waxed linen cord and began:


The knots in a net are a simple pattern of half hitches, but it takes a lot of practice to remember the sequence and form the loops evenly. In imitation of the real thing, decorations are strung along the top like floats, and on the bottom like weights. Because it is a fanciful art project, beads and things may be scattered around the netting as well. These are examples of some of the students' work:


Here's my first effort:


Pretty uneven, but, then, I don't need to catch any fish with it, I guess. My first knitting was probably pretty uneven, too. Decorations were some beads on the top and mainly some single earrings saved after I had lost one of the pair.

Notice the boo boo extra loop on the right side. Easy mistake to make, hard to correct. But, as I'm sure thousands of knitters and crafters have thought since the beginning of twisted fiber, what happens if I make that error consistently and on purpose? It's a pattern! It's a design feature!

Another mistake I made from the beginning of signing up for the class was the intended purpose of these little nets. From the git-go they looked like necklaces to me. I was a bit surprised that this had not seriously occurred to anyone else, and that the original vision was for them to hang in a window (light through glass beads) or in a frame or pinned to a board.

So in the afternoon session I laid out my journeyman effort with the intention that it should be a necklace and that a different shape would make it better to wear. Having used up most of the decoration stuff I brought, I had to repair to the shop downstairs for more dangle supplies. In the end, this is what came together:


Shell pieces, metal charms, bone and wooden fish, and a somewhat more even net! A necklace! A net-klace!


Thursday, July 14, 2016

Fiber & Friends #1

In spite of my good intentions, I just couldn't manage to blog during the Net Loft Fiber & Friends event in Cordova AK. It was all I could manage while attending daylong classes to poop out a few Instagrams; hope you enjoyed them. But I do want to tell  you about it all, so here goes in a post-happening series of posts.

Because the ferry schedule is so awkward, (so awkward, indeed, that the web site is hopelessly out of date and you'd better phone them if you're serious about going there) I had to arrive a day ahead of the start. This turned out to be a useful opportunity to scope out the town and environs. And at the Chinese restaurant just before I crossed the street to sign in, this was my fortune cookie:


The first Saturday and Sunday: a two-day workshop about hat design. Whaat? Two days to figure out how to knit a topper? Well, yes, if your teacher is the brilliant Bonne Marie Burns.

She used the humble knit beanie to give us insight into the design process of all knit garments. This means some serious and diligent swatching (stitch and row), and serious thought about sizing, materials, construction, and an historical detour into the development of the knit hat from the 1400s.

She taught us how the math of the top decreases rules the process, and how the designer can fiddle, fudge, frog, and maybe some other f-words, too, to make inspiration mesh with stitch counts and create a realistic plan for a real product.

We learned about using tear sheets for inspiration, and wrote our own design concept statements, followed by the hard graft of the actual plan for the design.
We measured heads, swatched swatches, swatched potential stitch patterns, tried out this 'n' that, so that by the end of the two days, I had a clear idea of what I wanted to do, and a definite plan for it,  but had not cast on a serious stitch yet. Eventually I did cast on, and in fits and starts and odd moments managed to make most of what I call the rough draft version of my hat.

The Big Idea was to make a 4-panel hat featuring a scallop shell texture motif in each one. The shell was based on one in an Alice Starmore sweater, Cape Cod by name. Executed in a different gauge and fiber, however, it was a miserable squashed caricature of a shell, so needed a good bit of revising and rescaling. Likewise, the panel dividers went through several iterations, as did the crown decrease method. I can now say with confident experience that as the proof of the pudding is in the eating, the proof of the pattern is in the knitting. You just don't know what it will look like till you know what it looks like. 

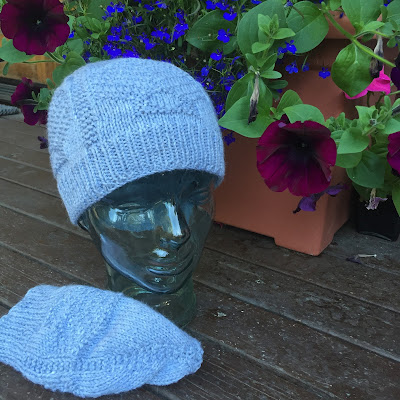
Here's the finished product, with rough draft huddled below.


 3/4 view:

 And the top. Just love that p2tog "button" as the center finish:

I have to say I'm really proud and pleased with myself, and massively grateful to Bonne Marie for all she taught us.